🌿 Spraying Made Simple: Elevate Your Garden Game!
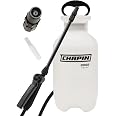
The Chapin 20002 is a 2-gallon lawn and garden pump sprayer designed for efficient spraying of plants, lawns, and pests. Made in the USA, it features a durable translucent poly tank, an anti-clog filter, and an ergonomic design for comfortable use. With a 12-inch extension wand and adjustable nozzle, it offers versatility for all your gardening needs.


Z**G
Great for DIY!!!
The pump arrived with everything advertised. It was neatly packaged and unopened. I used it to treat for pests. Product worked very well and got the job done. It doesn’t come with a pressure relief valve but there are instructions to safely realize the pressure without wasting product. After several minutes of spraying, my hand started to fatigue from squeezing the sprayer as it isn’t the easiest handle to squeeze. Overall the product works great for the average diy consumer.
O**R
I'm a happy refugee from the hand spritzer
For years I've been spraying my garden vegetable plants with hand spritzers. I apply water-diluted sulfur to my squash and melon leaves so they stay green and fresh, and water-diluted fertilizer to my tomato leaves. I need to spray both the tops and bottoms of leaves, but haven't been able to. I kept encountering the same problems with hand spritzers: spritzers that stop working all too soon; spritzers that will spray on tops of leaves, but not under leaves because they don't work when the nozzle is pointing upward; spritzers that can't fit in where I need to spray, so I can't get to the center of the plants; and spritzers that can't hold enough liquid to spray. I finally gave up and bought one of these. Before buying I could see I would be spraying with a wand, and that turned out to be ideal! I can spray in any direction (down or up) and I can reach in where I could not reach before. I'm not going back to hand spritzers!The included assembly instructions seemed confusing because they are for a number of different models, which made it difficult to figure out what I was supposed to do with this specific 1-gallon product. Turns out assembly and use are easy if you follow these steps:1) Rinse out the jug. It may contain dust and bits left over from the manufacturing process.2) Insert the filter-end (perforated cylinder end) of the white plastic tube. This will go to the bottom of the interior of the jug.3) Secure the white plastic tube you just inserted, on the outside of the jug, with the threaded-fastener that's captive and sliding on the outer hose, put there for this purpose. You're making a water-tight seal, so make sure everything is first seated right, then twist the fastener snugly in place.4) Attach the wand on the other end of the hose. You are again using a threaded-fastener that is sliding on the hose, and you are again making sure everything is first seated well before twisting snugly in place.That's it for the permanent assembly! For first-time use and to get a feel for how things work, fill the jug about 1/3 to 1/2 full with plain water. Drop the black pump into the top of the jug, with its handle on the outside. The handle is used to screw the pump into the jug so make sure the handle is down, into, and engaged in the top of the pump. Screw the pump in tightly since this has to be air-tight. Then unscrew the handle just a little, until it is loose and can be lifted up. Pump that handle to increase the pressure in the jug, and do it for longer than you might think necessary. Listen for leaking air where the pump is screwed in, and re-engage the handle into the pump to tighten it more if necessary.You want a lot of air in the jug so you can pressurize it for a lot of spraying. If you fill the jug too high there may be too little air to pressurize, and you won't be able to spray that much since not a lot will come out. You'll have to interrupt with more pumping sessions to get the pressure back up along the way. There's no law against this, it's just inconvenient. Filling half way or less makes the whole setup lighter for use, too.The wand has a handle you can squeeze, like at the gas pump, to get the spray going. Twist the end of the wand to change the shape of the spray, as you would with a garden hose.When you are done spraying, re-engage the pump handle into the pump, unscrew the pump and see and hear the pressure get released at the top of the jug around the edge of the pump.OK, you've gone through your practice session. Let's spray for real! Add water that dilutes what you are going to spray (use markings along the side of the jug to see 1-liter, 2-liters, quart, half gallon levels) and add your ingredient(s) to the water. You can shake the jug after it has been sealed and pressurized, then spray to your heart's content!Done for the day? Empty the jug and start again with plain water, then spray to clean everything out. I use this plain-water spray to water plants that could use it. Why waste the water?I am happy with my purchase, which is not something I always say. Of greatest importance? I see the effect on my plants!. Reliably getting to the undersides of leaves, and deep into bushy plants, are now easy, and really make a difference. They will for you, too.
C**S
Sprayer Storage Made Simple
What attracts me to this Chapin sprayer is its fully-round gasket. So many other models deliver a flat gasket that way too often dries up too soon, rendering the sprayer no longer usable. This Chapin sprayer with its rounded gasket pumps easily and holds good pressure with no leaks. Make sure you never store your pump while it is still under pressure, or for sure you will quickly flatten and ruin your gasket seal.Hey Chapin and gardeners, make note of how I am utilizing storage space by looping a few inches of the long-enough spray hose with a bit of duct tape, and then securing the hose at the bottom of the sprayer with an old bicycle inner tube, like a holster.I regularly use three different sprayers at home (roses, spiders, weeds) so utilizing storage space is essential, because sprayers with attached nozzles take up a lot of room.
☆**☆
Wish the hose was longer
I bought the 3 gallon one, it is very sturdy. It is also easy to pump, one pump lasts quiet a while. The only thing I wish this brand could offer is a longer hose because the one came with the spray is not long enough for me to reach the planters on my balcony's rail, so I have to take off the planters one by one for watering which is kinda inconvenient.
Z**Z
No more Incredible Hulk!!
So I was informed by a handyman that I could use a sprayer and a mixture of concentrated bleach and water to get rid of the green stuff on the side of my home (cement siding), and eliminate the need for a pressure washer, which has no regard for the siding, and can actually damage it overtime. I opted to find a good rated sprayer on Amazon, and I was on my way.It arrived in good condition; no damage to any components. The directions were somewhat helpful, as I've never used one of these pump-action sprayers before. However, they were not streamlined. I spent more time looking at the 'manual' and guessing which one I ordered to make sure there were no missing components (wand extension, etc. etc.). =/ However, when I finished reading the instructions and assembling it, things got better.The opening for the container is wide and good for a spill-proof encounter. Also, there are markings on the side telling you how much of what you've used. Of course, I needed to make sure I was using the correct amount of all liquids suggested (total of 4 liters, which is equivalent to 1 gallon... 3.785). I went for a heavily stained surface (per the bleach instructions), and I'm glad I did.Key points I learned were the following:1). When you're using the mist function, you don't have to pump as often (it tells you to pump until you can't anymore, essentially, but for me, average was between 12-15, depending on the amount of liquid remaining in the container. Less liquid=more pumps; up to 20+ at times). When I used the streaming function, I had to pump more frequently (obviously because more liquid was being discharged)2). When you're releasing remaining pressure from the chamber after most of the fluid has been used, and it's time for a refill, do so ever so gently... that exhaust could get ALL over your beautiful face... or explode if not done appropriately! LOL! It's not a fizzle... it's a booming FFFFSSSZZZZHHH!!!! But it doesn't go upward if done right... it's going outward. Phew. =)As for the statement the handyman made, he was right! This stuff helped me get rid of ALL of the green stuff growing on the side of my home. I just followed the instructions provided, and I was truly pleased. Nothing like a neat house. Also, I have a one-story home, but the ceiling is arched, and definitely the height of a two-story home. This thing got the mixture ALL THE WAY to the highest point of my home!! No ladder or nothing?! YO!! I couldn't believe it!! I mean it truly blew me away! I set it on stream, of course. I did it just by rotating the nozzle clockwise (facing away from me, just like a regular handheld spray bottle), pumped the crap out of the container, making sure to never stand over the container while doing so, pressed the handle on the wand, and voila! No more Incredible Hulk!! I did follow up with a water hose and rinsed the siding... it's just so nice. As for the container, I added water and a little soap to flush the lines prior to storage as recommended, though I'm assuming they'll stand the test of time.I had an overall great experience with this container. Oh! And I'm glad I didn't need the extension wand. When I pull it out again, I'm sure it'll not disappoint. 5 Stars. Hoping this review helps you in making your purchase. I guess we all like it when things go right for a daggone change. (= Have a wonderful day!Z.
Trustpilot
2 weeks ago
1 month ago