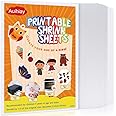
✨ Shrink your art, amplify your style! 🎨
Auihiay’s 12-piece printable shrink plastic set includes 6 white and 6 semitransparent sheets (8.3 x 11.6 inches) that shrink to 20% of their size and become 5 times thicker when heated. Compatible with inkjet printers, these dual-textured sheets (frosted for printing, glossy for finish) empower you to create personalized crafts like keychains, jewelry, and gifts—perfect for kids’ projects and meaningful Mother’s Day presents.


N**L
Inconsistent
First order of this product was amazing. I loved it so much that I used it up quickly and re-ordered. Unfortunately with the second batch, none of the white sheets were usable. I suspect they may have been damaged in some way, humidity during storage or shipping perhaps, and they will not print a clear image. I used up every white sheet trying to print the same image and didn't end up with anything I could use. So I guess I would say the quality is hit or miss.Update- adding stars for great customer service as they are sending a replacement after seeing this review. Thanks!
C**E
Great product
Love these! Works just as expected. Works great in my printer. No issue when shrinking. No learning curve.
D**S
The best!
The best shrink paper I’ve used.
A**Y
Did well!
Okay , so I’m giving this a 4 star…. BECAUSE, they do work! They work great in fact! But the only issue I had was, the clear sheets didn’t work with my printer. It was like it didn’t recognize it bc it was clear. The white paper did fantastic! When it shrinks the color does get darker (like with every other shrink paper ) but I already knew it would so I adjusted the color accordingly. I printed mine around 3.2 inches and it shrunk to about 1.2 so a good half size. When you take them out of your oven I use a glass and just makeSure to flatten it ! I do that with all brands ! Over all the product is great I just wish it would’ve taken the clear pages too.
F**E
Wonderful for little charms!
Wonderful!I don't know WHY I never thought to do this before!Printed with Cricut design space, cut out on the magnet 0.5mm setting (two passes with 'more' pressure) - and poof! Took a heat gun to them and the gave them a UV resin coating before putting on little charm chords.Worked great with my printer. Print on the non-glossy side. Trying to figure out the math of how big I should make it to get a certain size when shrunk went out the window and I was winging it. In general I feel like it shrunk by more than half. (3.8" tuned into roughly 1.5")Food for thought : The images do darken when shrunk. For the most part it just made my artwork more rich - but the blue hammerhead was a very pastel blue prior to shrinkage.
A**R
would repurchase
i've made a good handful of charms from this paper now, and i'm satisfied with the quality. there is a bit of a learning curve when you're starting out. here's a few tips I've picked up along the way:-reduce opacity of your image by 50% before printing (unless its B/W only) or the image will look terrible after shrinking. the prints will still come out a tad bit dark, and i usually do some manual touch-up work on my pieces to correct spots.-don't touch the front of the paper, & use gloves to cut out your pieces if doing by hand, as oils from your skin can ruin the paper.-make sure to use proper printer settings. this paper is slightly different from printer paper size, so input the proper dimensions. i also use the "matte photo paper" setting to print. (when i dont use this setting, i get slight horizontal lines across the image, likely due to the heavier weight of this paper when compared to printer paper)-bake those cookies until they lay completely flat, leave them in a bit longer if needed. i've never actually had one burn on me. quickly place between some heavy books & parchment paper to cool after baking to keep them flat.hope that helps someone just starting out!
S**L
It makes such cute charms
This product works well with a few tips below…Collect the pictures you want to shrink downNOTE...your pictures will need to be large to shrink down to a usable size (look at my pics)Print out your chosen pictures (I used an ink jet printer)Put the film into the printer... I used the shiny side of the film as my printer flips it over as it goes through so it prints on the mat side.Once printed, cut with sharp scissors, leave a little border area to punch a hole (I even punched a hole at the bottom so I could add a rhinestone dangle.Put a pin, a pokey tool, or an ice pick into the hole to hold the film securely as you heat the film.I didn’t use the oven, I used a heat tool, the film will curl and look distorted keep working with itand while it is hot set a paper weight or something heavy on it ...if it needs more straightening out re-heat.I used my pieces as a journal dangle.You might want to practice on something that won’t mater.NOTE you can also draw on the mat side of the film, or create words...good luck...have fun.
L**E
DO NOT WASTE YOUR MONEY, THESE RUINED CHRISTMAS.
Despite following the instructions to the letter these bubble HORRIBLY and NEVER flatten. I wish we hadn’t tried all of them, I’d send them back. We kept thinking it had to be us, but by the 3rd to the last one we realized it absolutely was not. Don’t waste your money! I wish I could give zero stars. I’d found one of my grandpa’s old Christmas lists and these were going to be a special surprise ornament for my family after he passed away earlier this year. I’m beyond angry that I wasted money on these.
Trustpilot
2 months ago
1 day ago